Page 2 of 6 FirstFirst 1234 ... LastLast
Results 31 to 60 of 170

Thread: USB Interface for DIY

  1. #31
    Supporting Member
    Join Date
    Oct 2013
    Posts
    108
    Post Thanks / Like
    Total Downloaded
    0

    Re: USB Interface for DIY

    I'll try and get that sorted this weekend

  2. #32
    Ace 1lokos's Avatar
    Join Date
    Jan 2012
    Posts
    5,323
    Post Thanks / Like
    Total Downloaded
    1.04 GB

    Re: USB Interface for DIY

    Quote Originally Posted by Jerry View Post
    Hi 1Lokos

    I ordered the BU0836A board and made a simple throttle quadrant with some cheap carbon pots as a test. They worked so well that I simply connected the X and Y axes to my old Logitech Extreme 3D Pro joystick and amazingly the stick is much more stable than before, although I'm still using the original pots.
    BU0836 is very good and easy to work.

    You can fit HALL Sensor + Magnets in place of this potentiometers in Logitech 3D, example:

    https://forum.warthunder.ru/index.ph...5#entry4192246

  3. #33
    Supporting Member
    Join Date
    Oct 2013
    Posts
    108
    Post Thanks / Like
    Total Downloaded
    0

    Re: USB Interface for DIY

    [IMG][/IMG]

  4. #34
    Supporting Member
    Join Date
    Oct 2013
    Posts
    108
    Post Thanks / Like
    Total Downloaded
    0

    Re: USB Interface for DIY


  5. #35
    Supporting Member
    Join Date
    Oct 2013
    Posts
    108
    Post Thanks / Like
    Total Downloaded
    0

    Re: USB Interface for DIY

    Quote Originally Posted by diziet View Post
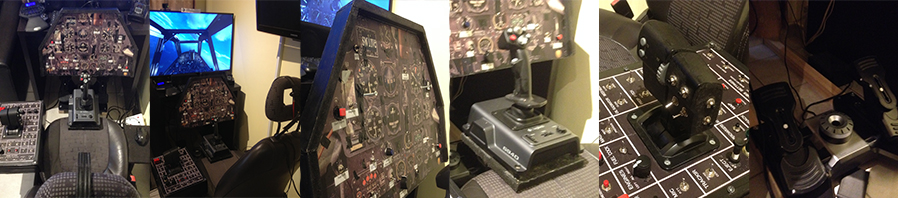
    So, here's a view of the guts of my engine management box....

  6. Likes Kendy for the State liked this post
  7. #36
    Supporting Member
    Join Date
    Oct 2013
    Posts
    108
    Post Thanks / Like
    Total Downloaded
    0

    Re: USB Interface for DIY

    Quote Originally Posted by diziet View Post
    [IMG][/IMG]
    Engine management box on left, trim box on right

  8. Likes Kendy for the State liked this post
  9. #37
    Ace 1lokos's Avatar
    Join Date
    Jan 2012
    Posts
    5,323
    Post Thanks / Like
    Total Downloaded
    1.04 GB

    Re: USB Interface for DIY

    Writing MMjoy2 firmware on Arduino Teensy 2.0 board to create a "USB joystick controller", able to handle up to 8 axes (10 to 14 bits = 1024 - 16.384 resolution points), up to 64 buttons (8x8 matrix,buttons above #32 - Windows limit, need keymaper), support encoders, allow set joystick curves, invert axes and apply filters in firmware, and more.

    1 - Plug the board in one computer USB port, using a USB to mini USB cable.

    Teensy2_0.jpg

    2 - The computer will recognize as "Unknown device" and a LED start blink on Teensy.

    3- Press the reset button on Teensy, the LED stop blinking and the board is now recognized as HID device.

    4 - Open the JoySetup.exe (MMjoy2 firmware package).

    5 - In "Device list and configurations" find a device with name like: VID:16C0 PID:0478 () - the numbers maybe varies.

    Teensy1.jpg

    6 - Select this device and in "Firmware" tab point for the files - in MMJoy2 package: "Firmware_lufa_[MMJOY2.ATMEGA32U4].hex".

    Teensy2.jpg

    7 - In "Chip" select "ATMega32U4", in "Bootloader type" select: Teensy2, "Port(arduino)": different from Arduino PRO Micro is no need set, leave this option as detected.

    8 - Click on "Upload firmware" - a DOS window will blink fast.

    9 - Now in "Device list and configurations" will appear a new device: "VID0000 PID:0000 MMjoy-reset(MMjoy2-20150727) <<< this is your new joystick controller, but "empty" for now, is need tell the how many axis and buttons will handle, as well give then a new identity (VID, PID, NAME). Select this device and configure his parameters.

    Teensy3.jpg

    10- In this example, I set one axis "Internal sensor" using FO pin on Teensy 2.0, with 14 bits of resolution (16.384 points)*, and assign this axis for "Throttle", 0 buttons is used, the new joystick controller is named as MJ-Teensy (default is MMjoy2), VID: 8884, PID: 8884 and click in "Save settings to device". After done, the JoySetup ask "Ok.Restart device?", click in "YES".

    11 - Now the new joystick controller will appear in Windows Control Panel > Game Controllers (joy.cpl), and are ready to use.

    Teensy4.jpg

    Later, if want change the joystick controller parameters run the JoySetup again and change/add what you need, like more axes, buttons, encoders, set filters, invert axis, set axes curves, etc.

    This "joystick controller" can be used to modernize a old (and good) joystick (e.g. gameport CH and Thrustmaster), DIY one, make a rudder pedal, throttle quadrant, button/trim box, etc.

    Cost?

    16 ~25$ (eBay, Sparkfun) for Teensy 2.0 or ++2.0.
    5$~20 for Arduino PRO Micro.
    Last edited by 1lokos; Jul-17-2016 at 09:45.

  10. Likes Kendy for the State liked this post
  11. #38
    Ace sw1ive's Avatar
    Join Date
    Feb 2013
    Location
    Hellas Athenss
    Posts
    1,020
    Post Thanks / Like
    Total Downloaded
    951.63 MB

    Re: USB Interface for DIY

    1lokos you put a lot of work into this.

    and I will put a lot of time study all of this...

  12. #39
    Student Pilot
    Join Date
    Oct 2013
    Posts
    10
    Post Thanks / Like
    Total Downloaded
    987 Bytes

    Re: USB Interface for DIY

    Hi!

    I used Arduino Leonardo, make my own sketck, and designed and constructed the "hardware", i hope you like it:


    And this is the explained link

    http://www.alasdeacero.com/index.php...tstart=0#14998
    Attached Images Attached Images
    Last edited by snagov; Oct-11-2015 at 15:53.

  13. Likes ATAG_Lolsav, Kendy for the State liked this post
  14. #40
    Supporting Member
    Join Date
    Oct 2013
    Posts
    108
    Post Thanks / Like
    Total Downloaded
    0

    Re: USB Interface for DIY

    Wow that's impressive! So much nicer than my effort!

  15. #41
    Ace 1lokos's Avatar
    Join Date
    Jan 2012
    Posts
    5,323
    Post Thanks / Like
    Total Downloaded
    1.04 GB

    Re: USB Interface for DIY

    Well done.

    Bottle caps (metal, plastic) make a good elevator (Timón Profundidad) trim wheel:

    http://i904.photobucket.com/albums/a...w/DSC06445.jpg

  16. #42
    Student Pilot
    Join Date
    Oct 2013
    Posts
    10
    Post Thanks / Like
    Total Downloaded
    987 Bytes

    Re: USB Interface for DIY

    This is my new version:

    WnZHZNW.jpg

    r2u5O6X.jpg

  17. #43
    Supporting Member
    Join Date
    Nov 2015
    Location
    Oak Island, NC
    Posts
    790
    Post Thanks / Like
    Total Downloaded
    80.50 MB

    Re: USB Interface for DIY

    Quote Originally Posted by 1lokos View Post
    For one that plan build a "button/trim box", make your own joystick, throttle, pedal, modernize old - but good gameport gear like 90's CH and Thrustmaster josyticks/HOTAS, some options in standalone USB controllers.

    BU0836A (41,39$) - control up to 8 axis - 12 bits (4.096 resolution points), up to 32 buttons or 16 encoders (each take 2 buttons position, e.g. use 4 encoders and 24 buttons), 8 way POV HAT. A "bullet proof", simmer's tested and aproved option (developed by Russian guy).

    DSD - (34.75$-39.75$) Have a affordable option for button/encoder controlers only - no matrix* need.

    Njoy32 lite/PRO (25-44 Euros) - The same controller used in Defender Cobra and VKB Mamba joysticks, Trottle Box, Pedals.
    (IMO) Probable the most advanced joystick controller existant - developed by Russian simmer's, with some differential, like digital axis, macros stored in non volatile memory... "Drawnback" is price in EURO. (Are other good options made by Russian simmer's, like F2/L2 (in/out), GVL224, but seems more easy buy from Martians that from Russia...)

    EDIT - Obsolete, see MMJoy2 - D.I.Y. Mjoy - Mjoy/Mjoy16 2004 project "build your own USB joystick controller", by Lituan guy caled Mindaugas (no longer involved) based on cheap ATMEGA microcontroller.
    Mjoy16 version control up to 8 axis, 96 buttons (16 toggle), 4 encoders (2 mode each), 8 way POV HAT.
    His drawback is that ATMEGA8/16 dont have USB in hardware, this is implemented by software, that limit to USB 1.1 protocol.
    Mjoy16 option is good for FSX but il-2 "pilots" consider his response times a bit slow, due high number of buttons controlled.
    Still usefull for trim/button box and even joystick (in case limit axis/buttons use to improve the bandwidth).
    Original Mindaugas board design are improved by guys like Lazzy_Cammel, Mercury_13, China...
    Cost ~15/25$ build one (I build around 8), sample of Mjoy16 D.I.Y. that I build in ~2008, and now use for test MMjoy firmware.

    MMjoy2 - Firmware for Arduino (ATMEGA32U4) boards, developed by MEGA_Mogz, with some Njoy32, F2/L2 characteristics.
    In short is a configurable joystick firmware, that is done by Configurator programn e.g. want a 2 axis controller? Enable just to two. Want control only buttons and encoders? Dont enable axis.
    Want some buttons as "toggle"? Just set in firware options.

    The last firmware version - for Mjoy boards - have support for digital axis.
    Control up to 8 axis - 12 bits (4.096 points).
    Up to 64 buttons - depends on Arduino board used, the limiter is the board pinout.
    Up to 64 encoders
    One POV HAT

    Examples of Arduino board:

    Teensy 2.0 (16-20$) - With MMjoy firmware control up to 8 axis (12 bits), up to 64 buttons (4 encoders), one 8 way POV HAT.
    Leonardo PRO Micro (5,50$ in eBay) - With MMjoy firmware control up to 8 axis (12 bits), up to 32 buttons (6 encoders), one 8 way POV HAT.

    Firmware flash is done though the USB cable.

    MMjoy project - use Google Translator:
    https://code.google.com/p/mmjoy
    https://code.google.com/p/mmjoy/w/list

    MMjoy Configurator (translated by me ): http://downloads/detail?name=JoySetup_ReadMe_En.rar

    MMjoy with external ADC (digital axis): https://code.google.com/p/mmjoy/wiki/ExtenralADC

    How write MMjoy firmware in Leonardo PRO MICRO board (in English): https://code.google.com/p/mmjoy/wiki/UpdateFirmware_eng

    * Matrix = this word scare some builders, but basically this only mean add a diode in one leg of each used button.

    Sokol1
    Here's another available in the good 'ol USA from Amazon (Disclaimer: I make and sell these):

    http://www.amazon.com/Gear-Falcon-Ge...rds=gearfalcon

  18. #44
    Student Pilot
    Join Date
    Oct 2013
    Posts
    10
    Post Thanks / Like
    Total Downloaded
    987 Bytes

    Re: USB Interface for DIY

    Hi folks...


    I was looking for information to build a button box with 32 buttons are not necessary axes. I have a arduino leonardo, and what I have found, is not working properly. Maybe MMjoy2 can serve, but neither is it works.

    Somebody can help me?

  19. #45
    Ace 1lokos's Avatar
    Join Date
    Jan 2012
    Posts
    5,323
    Post Thanks / Like
    Total Downloaded
    1.04 GB

    Re: USB Interface for DIY

    The "Leonardo" that can accept MMJoy2 firmware is Arduino Leonardo PRO Micro, based on ATMEGA 32u4 mc.

    If you have one of this boards, check this topic: http://simhq.com/forum/ubbthreads.php/topics/3899105/1

    If is other "Leonardo" model, is need find a HID firmware for their specific micro controller.

  20. #46
    Student Pilot
    Join Date
    Oct 2013
    Posts
    10
    Post Thanks / Like
    Total Downloaded
    987 Bytes

    Re: USB Interface for DIY

    Thanks Sokol...

    I tried MMJoy2, but, when tried to upload firmware, only show this:

    1ef6a19f3a36417bade1f71059f44ae6.jpeg

    Can you help me....AGAIN!


    Thanks!

    Edit: My "Leonardo" is "original"!

    Edit2: Now, i have another error:

    76b76b3b436344b295ac7085e26c46bd.jpeg
    Last edited by snagov; Jul-17-2016 at 17:34.

  21. #47
    Ace 1lokos's Avatar
    Join Date
    Jan 2012
    Posts
    5,323
    Post Thanks / Like
    Total Downloaded
    1.04 GB

    Re: USB Interface for DIY

    This messages show that are not communication between JoySetup and Arduino.

    This "COM16" appear when you press Arduino reset button?

    Is the COMM for what you install drivers?

    Are other COMM in device manage?

  22. #48
    Student Pilot
    Join Date
    Oct 2013
    Posts
    10
    Post Thanks / Like
    Total Downloaded
    987 Bytes

    Re: USB Interface for DIY

    Thanks Sokol... solved!

    I can´t explain the problem...but is working!

  23. #49
    Ace 1lokos's Avatar
    Join Date
    Jan 2012
    Posts
    5,323
    Post Thanks / Like
    Total Downloaded
    1.04 GB

    Re: USB Interface for DIY

    Nice.

    Sometimes this things take only some more attempts.
    My first firmware upload take several attempts... making the same thing.
    Last edited by 1lokos; Jul-19-2016 at 12:27.

  24. #50
    Supporting Member
    Join Date
    Feb 2016
    Posts
    214
    Post Thanks / Like
    Total Downloaded
    938.46 MB

    Re: USB Interface for DIY

    Quote Originally Posted by diziet View Post
    [IMG][/IMG]
    Did you use 1 turn potentiometers for the trim wheels?

  25. #51
    Supporting Member
    Join Date
    Oct 2013
    Posts
    108
    Post Thanks / Like
    Total Downloaded
    0

    Re: USB Interface for DIY

    I did but really wish I'd used multi turn. The inputs needed to adjust trim are really small...

  26. #52
    Ace 1lokos's Avatar
    Join Date
    Jan 2012
    Posts
    5,323
    Post Thanks / Like
    Total Downloaded
    1.04 GB

    Re: USB Interface for DIY

    I think the ideal will be 3 turn potentiometers, I try with 10 turn but adjust trim result very slow.

  27. #53
    Supporting Member
    Join Date
    Nov 2015
    Location
    Oak Island, NC
    Posts
    790
    Post Thanks / Like
    Total Downloaded
    80.50 MB

    Re: USB Interface for DIY

    Quote Originally Posted by 1lokos View Post
    I think the ideal will be 3 turn potentiometers, I try with 10 turn but adjust trim result very slow.
    I agree... I tried it with 10-turn gearing, but it was a little too slow to adjust, so I settled on 3 turns.

    Centered.jpgWIP.jpg

  28. #54
    Supporting Member
    Join Date
    Feb 2016
    Posts
    214
    Post Thanks / Like
    Total Downloaded
    938.46 MB

    Re: USB Interface for DIY

    Quote Originally Posted by diziet View Post
    I did but really wish I'd used multi turn. The inputs needed to adjust trim are really small...
    Yeah I'm looking at 3 turn ones, my X52 is essentially one turn and don't feel I have the right sensitivity for adjustments. I believe the Spit had 2 turns either ways so 3 turn pot would be happy medium. What's the throw length of the sliders? 80mm?

  29. #55
    Student Pilot
    Join Date
    Oct 2013
    Posts
    10
    Post Thanks / Like
    Total Downloaded
    987 Bytes

    Re: USB Interface for DIY

    Sokol, one cuestion....again....

    In MMJoy2, there are any posibility to use one interruptor (on/off) to work like a push button?

    I want use this:

    conmutador_rotativo.jpg

    Now, i have 3 pulsations on 4,5 and 6 button of MMjoy, but, permanent, not like a pushbutton.

    Any Idea?

  30. #56
    Ace 1lokos's Avatar
    Join Date
    Jan 2012
    Posts
    5,323
    Post Thanks / Like
    Total Downloaded
    1.04 GB

    Re: USB Interface for DIY

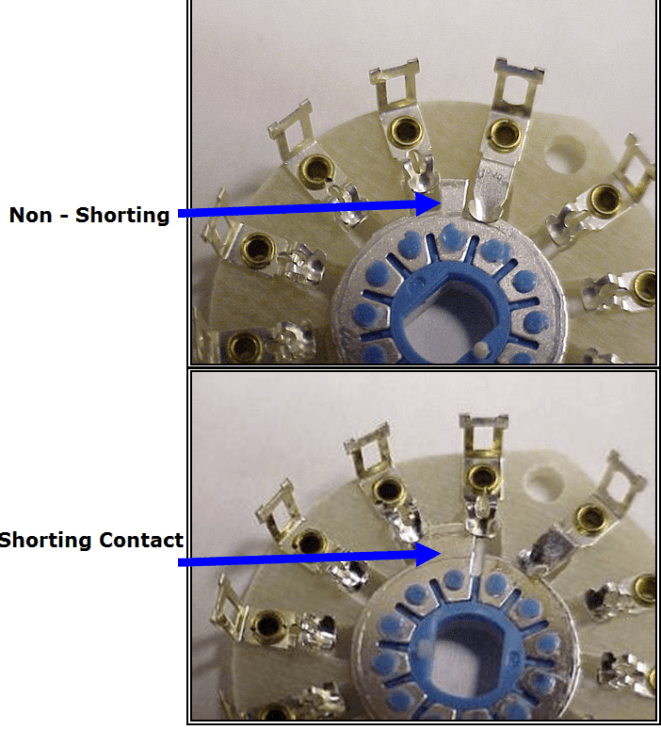
    Is because this rotary switch close new contact when are turned, so the button in MMJoy2 will be permanent ON, but in actual games this dont cause problem.

    Are models of this type o rotary switch with momentary contact between positions.

    But if you want momentary press, use encoder instead, turned CW they press one button, CCW press another.

  31. #57
    Student Pilot
    Join Date
    Oct 2013
    Posts
    10
    Post Thanks / Like
    Total Downloaded
    987 Bytes

    Re: USB Interface for DIY

    I need 3 positions like FW190 in DCS Series,
    Magnetos:
    1 position: off
    2 position: magneto 1
    3 position: magneto 2

    Encoder only give me 2 positions, you understand me?

  32. #58
    Ace 1lokos's Avatar
    Join Date
    Jan 2012
    Posts
    5,323
    Post Thanks / Like
    Total Downloaded
    1.04 GB

    Re: USB Interface for DIY

    OK.

    Make a test in games with this rotary switch you have to see if are collateral effects.

    The fact that contact is always ON in positions will be like the "toggle"(latch) switches on Warthog base throttle - in DCS work OK because is possible change commands behavior in LUA files for see command in ON and OFF states of switches. In "flight games" like IL-2 BoS became problematic because this see only momentary commands (ON), resulting awkward use this kind o switch without external keymaper with "mapped key on press" and "mapped key on release" ability (e.g. SVMapper).


    Or buy a new rotary switch, but the "non-shorting" type, this send only momentary command between positions:


    http://www.brimal.co.uk/rotary-switc...lder-tags.html

    Is possible make permanent contact switch send only momentary contact using optocouplers or capacitors circuit, but will be additional complication.

    BTW - Post this question in SimHQ MMjoy2 topic, maybe Mega_MOZG (MMJoy2 firmware author) have a suggestion of what can be done in JoySetup configurations.
    Last edited by 1lokos; Jul-20-2016 at 11:09.

  33. #59
    Student Pilot
    Join Date
    Oct 2013
    Posts
    10
    Post Thanks / Like
    Total Downloaded
    987 Bytes

    Re: USB Interface for DIY

    Quote Originally Posted by 1lokos View Post

    BTW - Post this question in SimHQ MMjoy2 topic, maybe Mega_MOZG (MMJoy2 firmware author) have a suggestion of what can be done in JoySetup configurations.
    Ok , I asked IN SimHQ , and this is the solution that tells me Mega_MOZG.

    Today I will try that solution....

    http://simhq.com/forum/ubbthreads.ph...r_#Post4280546

    Cheers..

    EDIT: The solution works perfectly !....
    Last edited by snagov; Jul-21-2016 at 10:22.

  34. #60
    Ace 1lokos's Avatar
    Join Date
    Jan 2012
    Posts
    5,323
    Post Thanks / Like
    Total Downloaded
    1.04 GB

    Re: USB Interface for DIY

    Nice, this MMjoy2 firmware is really flexible.

    BTW - Don't forget to map the 4rt position of magnet switch: M1+2 (1 and 2 is for RPM test only).

Page 2 of 6 FirstFirst 1234 ... LastLast

Bookmarks

Posting Permissions

  • You may not post new threads
  • You may not post replies
  • You may not post attachments
  • You may not edit your posts
  •