The answer to that question may be found in that can in the top left corner ..... no judgment, just saying is allOriginally Posted by JackMaXX


The answer to that question may be found in that can in the top left corner ..... no judgment, just saying is all

I have loaded the MMJoy firmware to the Arduino Leonardo board and can see the it in my devices and printers view as a controller "MMJ-reset". I have connected a 5 turn Pot to the board, wired from the 5v pin on the board to the sweep connection on the Pot and the return from one of the other connections on the Pot to the A0 pin on the board. when I try to configure the MMJ-reset controller in devices view, I get an error message.
Is there any docs on how to configure the Arduino Leonardo board using the MMJ firmware and how to connect pot and switches. all help appreciated.
Don't let Grudges fester and poison your future happiness......get your revenge as quickly as possible.
I'm probably a little late to the party, but wanted to let you know I'm going to have this trim control available on my Etsy site in a day or two. 10-turn pots are a little too much...this control has 2.75 turns. I'd like to build in more, but that would necessitate a bigger drive gear, and I'm trying to keep it small.
SpaceClaim_2020-07-27_15-46-40.png
https://www.etsy.com/shop/GearFalcon...platform-mcnav
Windows 10 Pro 64-bit
AMD Ryzen 7 3700X 8-Core, 16-Thread
32GB RAM
NVidia GeForce GTX1080 (Asus Rog Strix GTX 1080)
1 TB SSD
LG 4K 55" TV
Gear-Falcon General Purpose Joystick Controller, Gear-Falcon Quadrant and Trim, Gear-Falcon BF-109 Water Radiator Crank
"Find out what you don't do well, and then DON'T DO IT!" - Alf

1st steep you have done with success: flash the firmware.
This result in a joystick "template", the "MMJ_reset", without 0 axes and 0 buttons.
Now you need do the 2nd steep: using MMjoy2Setup again fill the "template" like you want.
What mean, open MMjoySetup, select "MMJoy2_reset" and define how many axes will use - in "Joystick Axes", and what pins they will use in Arduino - using HEX names, not the names on Arduino.
In the above example I set two axes, X and Y, use "Int.Sensor" case will use normal potentiometer or analog Hall Sensor, and for other types of sensor supported, see bellow in the drop down menu.
X axes I define with "manual calibration with center", e.g a rudder axis, and Y axes with "manual calibration without center" e.g. a throttle axis, just for show the options.
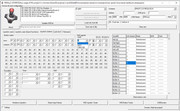
How many buttons - in "Joystick Buttons", through create a matrix of row x columns with inputs or defining how many Shift Register will use, each m/C allow 8 buttons.
In the example I create a 2x2 matrix (rows x columns) what allow use 4 buttons.
And in the right side of MMjoy2Setup translate the logical buttons (column "Joystick") in physical buttons (column H/W button), and (optional) special functions ("Mode"), like if a ON-OFF switches will press a button in ON and another in OFF.
Can just put
1 - 1
2 - 2
Etc.
Can change the name MMjoy2 for one that you want, eg. MyJoy.
After satisfied click in "Save settings to device". And if want make changes use "Load settings from device" change and save again.
A special note about VID/PID numbers (default 8888/8888).
A low number, e.g. 1111/1111 with show your nem controller as first device for Windows (and games), before other existing joysticks.
A high number, e.g. the 8888/8888 or 9999/9999 will show your new controller as last devices for Windows (and games), after other existing joysticks.
For comercial joysticks this numbers is set in Hexadecimal, you can see numbers used in DXDiag.
At fist leave the 8888/8888.
When you set a number, if want change latter need clear that number in Windows Register, or the Windows Games controller are not able to see your device again, but games continue see.
Last edited by 1lokos; Jul-28-2020 at 19:27.
 ATAG_JackMaxx liked this post
Thanks 1lokos. I'm making progress, I think i know how to configure axis and buttons, waiting for some slider pots to be delivered and shortly after will introduce my new controller to the world.
Don't let Grudges fester and poison your future happiness......get your revenge as quickly as possible.
Little Bill liked this post
Posting Permissions


 Reply With Quote
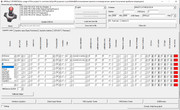

Bookmarks