Stasche - this is unreal dude. I showed my wife just to get her reaction and it was about what I expected - the threat of divorce if I even think about attempting something like that haha!!
Well done!!


Stasche - this is unreal dude. I showed my wife just to get her reaction and it was about what I expected - the threat of divorce if I even think about attempting something like that haha!!
Well done!!

New Huey setup. Been whittling away at it for a few months now and finally got it running. Landed the stormy ship landing mission on hard.
-Z

 SIA_Sp00k, ATAG_Pattle, farley, Kendy for the State, ATAG_Lord Wukits, Nails, sw1ive, ATAG_Highseas liked this post

Nice craftsmanship, but... metacenter seems high, no risk of "capsize"?Originally Posted by sw1ive


Last edited by 1lokos; Jul-20-2019 at 12:47.
sw1ive liked this post

LuseKofte me old mukah! I did go the SpitSim way, but one does need, deep pockets.
I still play CoD, and still patiently waiting for TF 5.0 (I was a young father when 5.0 was originally touted, I'm going to be a Grandad next week)!
Cliffs has not been the same since ACG all buggered off to BoM, BoS. Shit happens eh?
sw1ive liked this post
Trying out a new switch panel. Not sure about these switches yet. They are miniature switches that I ordered with long levers and 12mm barrels so they look like full-size switches, but don't have much throw. I have some full-size switches on order to try out as well.
I am thinking of offering this complete switch panel for DIY cockpit builders while I continue working on my full cockpit controls. It would be made of black plastic, with 18 SPDT switches providing 36 inputs, have a USB joystick controller with cable, and connectors on the back for optionally adding up to 8 analog axes later. I'd leave the front of the panel without mounting holes, so the user could drill them wherever they wanted, or even use another method to attach it to their cockpit, like glue.
I'd make available an Inkscape drawing that can be easily customized in order to print a label that could be placed over the panel once the user has buttons assigned. I'm thinking they could print onto sticky full sheet label stock for a permanent switch assignment, or print onto card stock so the label could be easily switched out when changing planes.
Here are a few views of the prototype... I 3D printed the panel and the holder for it for test purposes, but the actual panel will be made of black resin, and of course the panel would be recessed into a cutout on the cockpit builders instrument panel or side board or whatever. I made a quick PC board for it on my CNC mill, but the end product will have a regular PCB.
IMG_20190804_152630697_compress60.jpg IMG_20190805_144406870_compress91.jpg IMG_20190805_144417741_compress7.jpg
Windows 10 Pro 64-bit
AMD Ryzen 7 3700X 8-Core, 16-Thread
32GB RAM
NVidia GeForce GTX1080 (Asus Rog Strix GTX 1080)
1 TB SSD
LG 4K 55" TV
Gear-Falcon General Purpose Joystick Controller, Gear-Falcon Quadrant and Trim, Gear-Falcon BF-109 Water Radiator Crank
"Find out what you don't do well, and then DON'T DO IT!" - Alf
Here are a couple pictures of the quick-swap label bezels. I'll have these made up in thin steel, and have to option to glue a couple magnets onto the main bezel. The user can print up control labels for multiple cockpit configurations, stick them onto the quick-swap bezels, then swap out the bezels and load different control settings when they change planes.
IMG_20190806_130333682_compress54.jpg IMG_20190806_130347114_compress50.jpg
Windows 10 Pro 64-bit
AMD Ryzen 7 3700X 8-Core, 16-Thread
32GB RAM
NVidia GeForce GTX1080 (Asus Rog Strix GTX 1080)
1 TB SSD
LG 4K 55" TV
Gear-Falcon General Purpose Joystick Controller, Gear-Falcon Quadrant and Trim, Gear-Falcon BF-109 Water Radiator Crank
I started feeling guilty about how little I had contributed but how much I had absorbed from everyone here and the projects they had shared, so I finally snapped a few pics of the project I threw together with quite a bit of guidance from Sokol and Mr Highseas (and a ton of inspiration from everyone here!). I am a cheap ass where I can be so I ended up just building me and the Mrs. a couple desks from pipe fittings and wood from the local home improvement store. This allowed me to fit things exactly into the space I had where I needed them and still able to tuck out of the way when not in use.
20200112_204609.jpg
Stowed
20200112_204513.jpg
Ready to go
20200112_014341.jpg
I built the button box from wood and sheet metal and ended up buying the electronics inside. It may not have been the most cost effective (switches/pots/Arduino were probably $125 or better) but was a huge learning project and ended up being quite a bit of fun once I figured things out. I probably should have had some PCBs made but ended up doing 2 shift register boards and the Arduino mainboard just with busboard material.
I would have loved to be able to get a couple different lights and such working but was purely exhausted by the time I muddled myself through learning everything else so figured …. maybe later lol
20200112_150639.jpg
Last xmas the wife got me one of the surplus cockpit lamps used in spits and multiple other planes. It was immediately rewired and put into service!
Thank you all for being such a welcoming community.
ATAG_Oskar, ATAG_kiwiflieger, ♣_Spiritus_♣, ATAG_Noofy, Little Bill, 1lokos, Gingerbread, farley, sw1ive, ATAG_Highseas liked this post
So my Saitek Cyborg Gold is showing it's age... bought it in 2002 and have been using it ever since. Lately it has been getting pretty loose and sloppy, so I took it apart and tightened some stuff up, which helped a lot. Last week it started having some bad spikes in the Y axis... my aim is bad enough without that, so I am on a quest to get a new joystick set up.
IMG_20200116_153240708_compress73.jpg
I had my wife buy me a PXN "Vibration feedback" joystick on Amazon for Christmas, which I assumed was force-feedback. Tried it out, and while it was not horrible as a plain joystick, I could not get the "Vibration feedback" to work at all, even after downloading the latest drivers from their web site. The buttons were very stiff to push, and I decided it just wasn't worth the money, so I sent it back.
Fast forward to this week... I bought a Logitech Extreme 3D Pro on Amazon. Looks like a well-made joystick, maybe I can get used to it. The action is pretty stiff...I had a test flight and found the spring was so tight, and the "throw" was so short it was hard to make small gentle movements in flight. Every move I made really jerked the plane around, and I had a lot of trouble aiming. Even more of a problem... the base is VERY wide. I suppose that is great if you are putting it on a desktop and don't want it to move around. Problem is, I put the joystick on a pedestal between my legs, and this one is so wide that I have to spread my knees uncomfortably wide to get it in there.
I thought I'd kill two birds with one stone, as it were. I decided to add an extension onto the shaft so I can place the base on the floor, as I have seen others do. I don't care about the extra buttons or axis on the base, so it doesn't matter that i won't be able to reach them. I'm going to start with a 20" shaft, that should put the joystick at about the same height I have it now, as well as giving me me lots of travel to smooth out the movement (and reduce the amount of felt stiffness from the spring). If it is too much travel, so I have to move the stick too much, I can always easily shorten the shaft and just raise the base off the floor a commensurate amount until I get it just right. The only other thing that might be a problem is that with the extra leverage afforded by the extended shaft it might be easy to over-travel without realizing it, and break something. I have an idea for a kind of ring that will go above the base to prevent over-travel. I don't care about the "Twist" axis on the joystick, as I have rudder pedals, so I can disregard worrying about trying to make that work, and just removed the potentiometer for that function.
I cut a 20" piece of gray PVC outdoor electrical conduit to use as a shaft, and spent a couple hours with my calipers devising some adapters that I can 3D print to attach the shaft to the base and handle. Started to print them out last night, but a part on my 3D printer extruder assembly broke partway through and ruined the adapters. I glued the broken extruder part back together, and it lasted long enough to print a replacement part. The partially printed adapters were far enough along that I was able to test fit and function, and allowed me to make some adjustments to my models. I'm printing the revised adapters as we speak, so should be able to test it out this evening.
IMG_20200116_104621576_compress34.jpg IMG_20200116_104709819_compress20.jpg SpaceClaim_2020-01-16_10-45-27.png
Wish me luck!
Kendy
Last edited by Kendy for the State; Jan-16-2020 at 16:51.
Windows 10 Pro 64-bit
AMD Ryzen 7 3700X 8-Core, 16-Thread
32GB RAM
NVidia GeForce GTX1080 (Asus Rog Strix GTX 1080)
1 TB SSD
LG 4K 55" TV
Gear-Falcon General Purpose Joystick Controller, Gear-Falcon Quadrant and Trim, Gear-Falcon BF-109 Water Radiator Crank

Great work Kendy. I shall be watching your progress with interest.
I have a Thrustmaster T Flight Hotas which I have had for about eight years. It is as solid as a rock. I have thought about changing it for a fancier joy stick but hell it works great for me so I am sticking with it.
Keep up the good work.
Vickers Wellington Mk1c. OJ-F P2517 'F for Freddie' of No.149 Squadron, star of 'Target for Tonight' directed by Harry Watt released in July 1941.
Freddy prepares for an air test prior to departure from Ford on ops with No.149 Squadron for a daring daylight attack on Marshalling Yards in Caen France 31\1|21. ATAG Operation Milk Run. Target destroyed. Six Wellingtons, One Blenheim together with
their Spitfire escort returned safely. One Wellington crashed on landing at Ford.
sw1ive liked this post
All done! Took a few tries on the printer..I usually print in PLA, as it doesn't warp when it cools, but it is more hard and brittle than ABS, but ABS is stronger, so I figured I'd do it in ABS. Had to play around with the settings for ABS until I got it just right, so ended up printing 3 times before I got some parts that worked. Put it all together and clamped it down, then realized it was a little too tall, so took it apart and cut a couple inches off the shaft. Put it back together, moved the base forward about 4 inches, and calibrated. Feels really good, "throw" is an order of magnitude more than with the original stick, so it should really smooth out my flying. Maybe I'll be able to hit something now!
IMG_20200116_220015690_compress86.jpg IMG_20200116_220100178_compress66.jpg IMG_20200117_101802235_compress0.jpg IMG_20200117_102357026_compress5.jpg IMG_20200117_110514721_compress51.jpg
Windows 10 Pro 64-bit
AMD Ryzen 7 3700X 8-Core, 16-Thread
32GB RAM
NVidia GeForce GTX1080 (Asus Rog Strix GTX 1080)
1 TB SSD
LG 4K 55" TV
Gear-Falcon General Purpose Joystick Controller, Gear-Falcon Quadrant and Trim, Gear-Falcon BF-109 Water Radiator Crank
Took a test flight and found there is too much throw on the stick...it takes a LOT of movement to get a little reaction out of the controls. I took another 6" off the shaft, and built a platform to raise the base 6". Flew last night for a bit. Set the sensitivity on the axes to maximum, removed the dead zone from the elevators and set it to .01 on the ailerons. Still takes quite a bit of movement, but not as bad as before. My muscle memory is used to very little movement, so maybe it will just take time. it's harder to follow planes when they make violent maneuvers, as I'm just not used to moving the stick so much. On the other hand, I find my aim is better. I'll run this way for a couple days before I decide if I want to shorten it some more.
IMG_20200117_162503564_compress17.jpg IMG_20200117_171740905_compress87.jpg IMG_20200117_171748167_compress41.jpg
Windows 10 Pro 64-bit
AMD Ryzen 7 3700X 8-Core, 16-Thread
32GB RAM
NVidia GeForce GTX1080 (Asus Rog Strix GTX 1080)
1 TB SSD
LG 4K 55" TV
Gear-Falcon General Purpose Joystick Controller, Gear-Falcon Quadrant and Trim, Gear-Falcon BF-109 Water Radiator Crank
.
Hello... here is a video link with HOMEMADE FULLMOTION COCKPIT WITH VR GOOGLES...
.

Making the most of being stuck in the house and gave the cockpit a revamp
SimPit (1) (Copy).JPG
SimPit (2) (Copy).JPG
SimPit (3) (Copy).JPG
SimPit (4) (Copy).JPG
SimPit (5) (Copy).JPG
danperin, Kendy for the State, farley, ATAG_JackMaxx, sw1ive, PhoenixCNE, ATAG_Highseas, Nails liked this post
Love what you did with the keyboard...looks great!
Windows 10 Pro 64-bit
AMD Ryzen 7 3700X 8-Core, 16-Thread
32GB RAM
NVidia GeForce GTX1080 (Asus Rog Strix GTX 1080)
1 TB SSD
LG 4K 55" TV
Gear-Falcon General Purpose Joystick Controller, Gear-Falcon Quadrant and Trim, Gear-Falcon BF-109 Water Radiator Crank

Devlin thanks for posting. Every time someone makes a new post here I enjoy looking through the old posts and again seeing what some of you guys are able to do. If you do not mind I would like to ask you a couple of questions... Does the compass on your throttle actually work? And what did you use to label your keyboard? I don't dare turn my keyboard upside down and label the keys as you did, as my wife also use it for normal PC things, but I want to put some little labels on my Warthog Throttle controls. Thanks again for posting S`
I7 12700K @ 4.8Ghz|RTX 3080Ti|32GB DDR4|1TB NvMe l LG OLED 48”TV|1440P @120Hz|VKB STECS l VKB Gunfighter III/100mm extension l MFG V3 Pedals l Falcon Gear Quadrant l TIR 5 l Cloud X Headphone|Widows 11, C:\Program Files (x86)Steam\steamapps\common\IL-2 Sturmovik Cliffs of Dover Blitz|20Mbs dl, 2Mbs ul
sw1ive liked this post
Thanks Bill, the compass is just cosmetic but the keyboard setup is fairly simple. If you have second USB keyboard you can make one as windows can handle having two connected. I just printed the the labels on card and hot glued them on and set up the proper assignments, its a lot easier than trying to remember all the buttons. Build a simple mount to prop it and your good to go. I'll attach the layout below and if you want the illustrator file so you can customize it yourself just let me know
ATAG keyboard 2.jpg
Thanks, very clever.
sw1ive liked this post
.
SimPit (4) (Copy).JPG
Thanks Devlin, your cockpit (buttonbox-Keyboard) is well-constructed construction .
and, I like blue leds over the (upside-down) keyboard
I remember my first cockpit was (all an the desk) without TrackIR
tracking with trackball mouse.
IMG_4754.jpg IMG_4755.jpg
and, I remember my no3 cockpit with blue leds
Yoke for bombers and joystick for Fighters
IMG_3505.jpg IMG_3495.jpg
today I am on no6 cockpit !!!
same links with keyboards modifys...
.
One thing I have to ask you folks with the modified keyboards...I don't think the game (or Windows, for that matter) differentiates between the keyboard you have marked up to use as a control panel, and the regular keyboard. So pressing the letter "a" on your marked up keyboard is the same as pressing the letter "a" on your regular keyboard. How do you type in chat if all the keys are assigned to game functions?
Windows 10 Pro 64-bit
AMD Ryzen 7 3700X 8-Core, 16-Thread
32GB RAM
NVidia GeForce GTX1080 (Asus Rog Strix GTX 1080)
1 TB SSD
LG 4K 55" TV
Gear-Falcon General Purpose Joystick Controller, Gear-Falcon Quadrant and Trim, Gear-Falcon BF-109 Water Radiator Crank
sw1ive liked this post
Very nice sw1ive , great setup, this is about Version 4 LOL. I had to add the lights after I made it as with the room lights out i couldnt see the buttons. The flightstick and throttle tuck in behind the keyboard too so I can slide it out of the way when not in use.
Once your in chat the letter keys have preference so no problems
sw1ive liked this post
Oh, right... I guess I knew that. Sorry,stupid question!
Windows 10 Pro 64-bit
AMD Ryzen 7 3700X 8-Core, 16-Thread
32GB RAM
NVidia GeForce GTX1080 (Asus Rog Strix GTX 1080)
1 TB SSD
LG 4K 55" TV
Gear-Falcon General Purpose Joystick Controller, Gear-Falcon Quadrant and Trim, Gear-Falcon BF-109 Water Radiator Crank
sw1ive liked this post

That is Awesome !
- ASUS ROG MAXIMUS Z790 HERO - i9-13900k - ASUS ROG STRIX RTX 4090 OC - 32GB Corsair Dominator Platinum DDR5 5600MHz -
- CORSAIR 1200w HX Series PSU - Corsair H100x Hydro Series CPU Cooler -
- Big Screen Beyond -
- Virpil T50 Mongoos Flight Stick -
- TM Warthog Throttle -
- Slaw Device 109 Cam Rudder Pedals -
Highseas Peripherals
- Engine Switch Panel - Munitions Switch Panel - Throttle Quadrant Trim Box - Helicopter Collective - Analogue Brake Lever -
Operated by a 1972 Standard Issue Talking Monkey

I was to upgrade my pit with a new yoke due to the incoming TF 5.0 and Wellington, The currency working against me wanting a YOKO Yoke
yoko_1024x831_logo_STAY-600x487.png
I had to do with a Honeycomb yoke for now
Alpha-Flight-Controls.jpg
But it turned out to be a very good buy, For combat sim the pushbuttons are a bit misplaced. reviews put it second to YOKO on movement and smoothness and above for buttons. So my yoke stick setup looks like this
91798192_3377850425576709_73495037987520512_n.jpg91894574_3377849965576755_2404696221311565824_n.jpg
So if this had a Yoko yoke I would personally think it I have the perfect Chopper/Wellington/P40/Wildcat/JU88 pit. Honeycomb is quite good though with 90 degree turn both ways= 180 degree and adequate push pull pitch
Last edited by LuseKofte; Apr-03-2020 at 09:17.
I was working out how I could get this beautiful replica home, so I could fit my instrument panel in it! Picture taken at the Battle of Britain Memorial, Caple Le Ferne, Kent. Last year!
Stay safe you lot!

Last edited by Nails; Apr-04-2020 at 10:40. Reason: Added Location
I've also added the SpitSim full size controller/pedals - You need very deep pockets if you go down this route unfortunately.

ATAG_Marlow, ATAG_Snapper, ATAG_Jerry, 1lokos, ATAG_kiwiflieger, PhoenixCNE, Ohms, Marco, farley, Artist, ATAG_JackMaxx, VO101_Tom liked this post
Since I cobbled this together, the Oil & Fuel pressure gauges have been replaced with working ones. The control column is a full sized spade grip with rudder pedals.
DD_FT, Ohms, ATAG_Marlow, ATAG_Jerry, Kendy for the State, Marco, ATAG_Soldat, rontaila, farley, Nightdare, 69th_Zeb, ATAG_yotheguy liked this post
Heya'll. Long time no see.
Long story short...have put the spit simpit on the side for a bit. Took my boys to the aircraft salvage yard nearby and dragged home a Cessna Aerobat fuselage. With coronacopalypse at hand, I've had ample time to weld up some skids for a dual control heli conversion.
The controls will be modeled after the OH58d Kiowa (coming out soon in DCS). For the collective, I have also been working on some of my own switches, as the Otto ones are $80 a pop and are plastic (meh). Currently working on an internal throttle mechanism.
~S~

ATAG_kiwiflieger, farley, ATAG_Snapper, Little Bill, ATAG_Oskar, Nightdare, Nails, Marco, ♣_Spiritus_♣, ATAG_yotheguy liked this post
Bloody hell Zeb - Deep pockets!
The wife has a go - ATA delivering Hawker Hurricane from Northolt to Tangmere!
Posting Permissions

 Reply With Quote
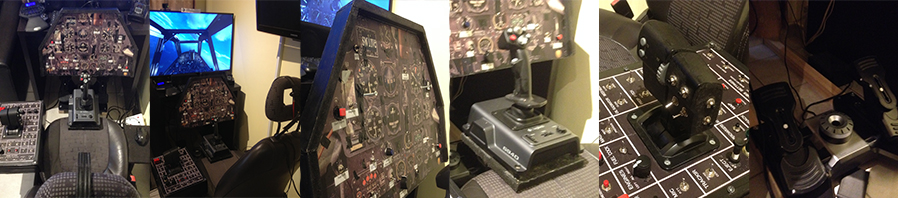


Bookmarks